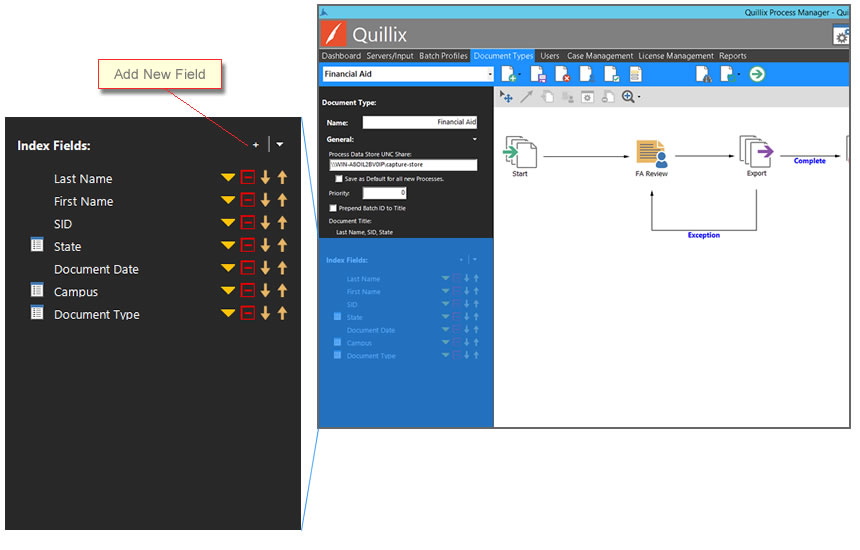
Document Fields are created and edited from the Properties Section on the Document Types Panel in the Process Manager Application. To add a new Document Field, click on the plus (+) sign to the right of the Index Fields caption.

Figure 1 - Process Manager Document Index Fields
Document Field Properties define data characteristics and behaviors for each field.
|
Field Name |
The Field Name is the display name for the field. The Field Name will appear as a label on Indexing forms and other areas within Quillix where field values are displayed or edited. |
|
Data Type |
The Data Type defines how the field's underlying data is stored in the database. Choices for Data Type include:
A value of String is the most flexible option, even for most numeric data such as dollar amounts and account numbers. The format of acceptable data input can be controlled using a Field Mask to restrict field entry to numbers only. The Number data type is only recommended when numeric sorting is required. The Date/Time data type is recommended for all dates. Note: The Data Type cannot be changed once a field has been created. Note: The Date/Time data type requires the use of a Date/Time field mask |
|
Display Type |
The Display Type defines how the field is displayed in the Web Client.
|
|
Edit Picklist |
The Edit Picklist link is enabled when the Display Type is set to either Picklist or Multi-Select Picklist. When clicked, the Edit Picklist dialog box will be displayed to allow for editing the picklist values. |
|
Default Value |
The Default Value is automatically populated in this field when a new Batch of this type is created. Additionally, you can pre-fill a batch field with a dynamically generated default value that is based on information in the possession of the capture system at the time the Quillix client user is indexing a document. The system default values you can choose from in the list are explained below:
|
|
Field Mask |
A Field Mask restricts data entry into the field based on the format of the mask. Field Masks are dependent on Data Type and Display Type. Quillix provides these standard field masks:
Custom Field Masks In addition to the standard field masks available in Quillix, custom field masks may also be created. See the topic Creating Custom Field Masks for more information. Note: The Date/Time data type requires the use of a Date/Time field mask |
|
Min Length |
The Min Length property determines the minimum number of characters a field may contain when edited. This property is enforced in the Web Client at the time of editing. |
|
Max Length |
The Max Length property determines the maximum number of characters a field may contain when edited. This property is enforced in the Web Client at the time of editing. |
|
Visible |
The Visible property determines the visibility of a field in the Web Client. When checked (default) the field will be visible and editable with the appropriate user permissions. When unchecked, the field will not be visible in the Web Client. A field that is not visible can be useful in holding intermediate values for workflow decisions and as flags for conditions that are used by other integrated systems. |
|
Read Only |
The Read Only property disables editing and input of the field in the Web Client. This property only affects behavior in the Web Client, and the field value can still be changed by QSX modules or other processes outside the Web Client. |
|
Sticky |
Select the Sticky check box to make a document field sticky. When a Quillix client user enters an index value into a sticky field, that information persists or "sticks" in the field after the Quillix client user starts a new document with the current file or appends the file to a document that is already started. If the field is not sticky, the field will be cleared when the next unclassified file is displayed on the Index Batch tab in the Quillix client. |
|
Required |
The Required property is enforced by the Web Client when editing. When checked, the Required property will not allow the field value to be saved without a value. |
|
Searchable |
The Searchable property makes the field available for searching in areas of the product that provide searching capability. |
|
Trigger a database lookup |
This property enables a database lookup to be triggered from the field when the focus leaves the field during editing. A database lookup will initiate a database query using the value of the field as a key value. Data returned from the query is then populated in one or more index fields. When enabling this feature, a database lookup must be configured by clicking the Edit button next to the property check box. See the topic Database Lookup for more information on configuring Database Lookups for fields. |
The order of Index Fields can be changed by clicking on the "up" or "down" arrows next to the field name in the field list.
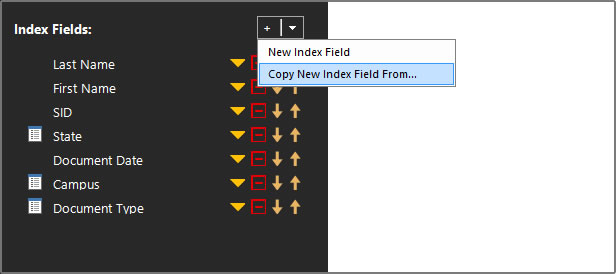
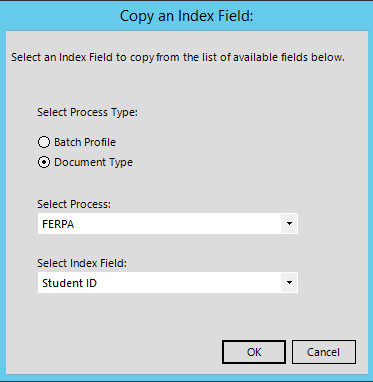
A new document field may be created using the settings of an existing field. To create a new field from existing settings, click the down arrow next to the Add Field button and select Copy New Index Field From... From the Copy Field Dialog, select the field you wish to copy from.

Figure 2 - Copy Field Menu

Figure 3 - Copy Field Dialog