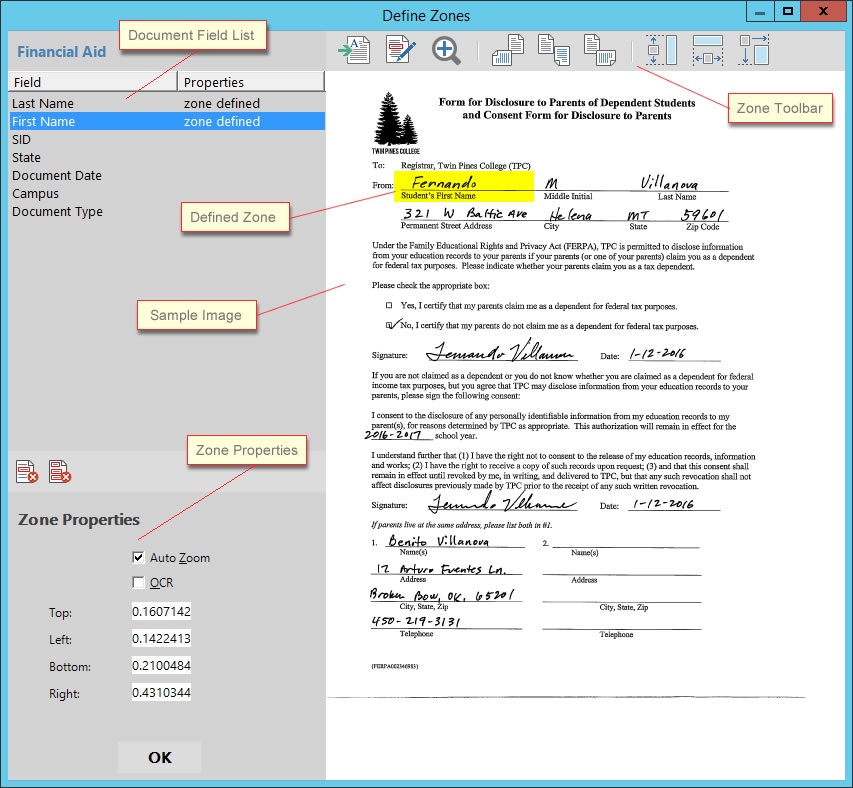
Document Zones are used to define specific areas on a document that can be used with the Auto Zoom and Zone OCR features in the Quillix Web Client. Document Zones can be used with the Zonal OCR QSX as well, to enable server OCR capability.
The Auto Zoom feature of Quillix enables the automatic zooming of an image with the input focus based on the zone defined for the field. This facilitates improved indexer focus and accuracy during manual indexing. In order to enable the Auto Zoom feature in the Quillix Client, a zone must be defined for the field, and the Auto Zoom option must be checked for the field.
The Zone OCR feature of Quillix provides client-side OCR of documents based on zones defined for fields. In order to enable the Zone OCR feature in the Quillix Client, a zone must be defined for the field, and the OCR option must be checked for the field.
The Zone OCR feature can also enable server-side OCR capability when used with the Zonal OCR QSX.
Zones are defined for a Document Type from the Define Zones dialog. To access the Define Zones dialog, click on the Define Zones button on the Fields Toolbar in the Document Type settings in Process Manager.

Figure 1 - Define Zones Button on Fields Toolbar
In order to begin defining Zones for a Document Type, a sample image should be loaded into the Zone Definition Tool using by clicking the Load Image Button on the Zone Definition Toolbar.

Figure 2 - Zone Definition Toolbar
With the sample image loaded, select a field from the field list, and begin drawing zones using the Draw Zones tool. The defined zone for each field is displayed with a yellow highlight. Select the Zone Behaviors (Zoom and/or OCR) for each field and click OK to save the Zone Settings. Auto Zoom is used by the Zoom To Zone feature in the Quillix Client. Similarly, OCR is linked to the Zonal OCR Tool in the Quillix Client. Please refer to the User Reference documentation for more information.

Figure 3 - Zone Definition Tool