The Quillix Document Viewer is a full-resolution multi-format viewer capable of rendering a variety of file formats for display in the Quillix Content Client. The Quillix Document Viewer is capable of natively displaying most file formats including:
The Quillix Document Viewer provides display, print, rotate and zoom for all supported documents.
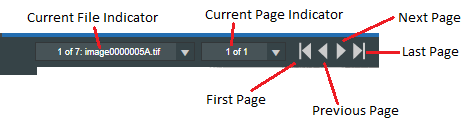
The Document Viewer Toolbar on the top of the Document Viewer provides for basic navigation of pages in a document.
Figure 1 - Document Viewer Navigation Toolbar
Each document may have one or more files attached to the document. Each file is listed in the 'Current File Indicator'. The 'Current Page Indicator' shows which page of the current file is being viewed. The Page navigation buttons (First, Previous, Next and Last) can be used to navigate all the pages of the document. When you are on the last page of a file and select 'Next Page', the viewer will move to the first page of the next file. Similarly when using 'Previous Page', the viewer will move you to the last page of the previous file.
The new page will be displayed at a zoom level based on the fit option as described below.
Large and non-renderable file types (ZIP, DLL, ISO, etc.) are represented by a placeholder image instead of the file. If you need to see one of these files, you can use the 'Download File' button on the viewer to download a copy of the file and view it in a native viewer. Your system administrator is able to set configuration values to define a 'Large' document.
Pages can be modified in order to change their orientation. The controls to perform page operations are located on the Page Toolbar on the left of the Document Viewer. The top two buttons on the Page Toolbar let you set the current selection mode. The remaining buttons are used to change the orientation of the displayed page. These tools only modify the current view of the page. They do not modify the underlying file. If you want to modify the file, you must use the 'Check Out' feature on the Result Panel.
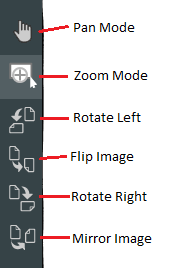
Figure 2 - Page Toolbar
Selection Modes
The Quillix Document Viewer provides two different selection modes to control the behavior of the mouse when clicking and dragging on a page displayed in the viewer. The selection mode is set by clicking one of the first two buttons on the Page Toolbar. In the screenshot above, the Zoom mode is selected. The available selection modes are:
The remaining buttons at the top of the Quillix Document Viewer provide more options for controlling the view of the current page and some other functions. The operations available are:
Print and Email only work on printable files. Non-printable files include audio and video formats, ZIP, TAR, GZ and other unrecognized file formats. Additionally, your System Administrator may set a max size for rendering known file formats. Any files larger than that limit are non-printable.
This feature requires the tray application QCMHelper. If QCMHelper is not running and you are on a supported Operating System, you will be prompted to download and install the app. QCMHelper is available for Windows.
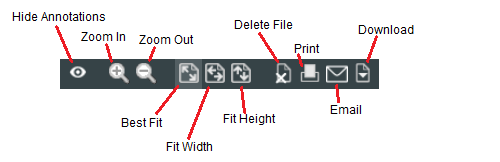
Figure 4 - Page Toolbar
Note: Some buttons may not be available depending on your user rights as assigned by your system administrator
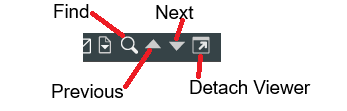
Version 5.4 added a few more buttons to the right of the Download button on the toolbar. The first three are used together to implement the Find feature in PDF files and are only enabled when viewing a PDF.
The remaining buttons on the left of the Quillix Document Viewer provide tools to create annotations. The available annotations are:
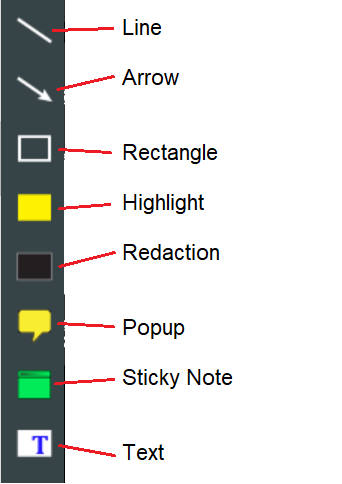
To create a new annotation, click the desired button and click and drag on the viewer image at the location for the annotation. To modify an annotation, you may double-click it to open the properties window or right-click to see a context menu with options. The context menu has options to show the annotation properties, to delete an annotation or to move it to above (top) or below (bottom) the other annotations. You may also move or resize an annotation. Just click on the annotation to display the grab handles, then use the grab handles to resize the annotation. To move it, just click in the body of the annotation and drag it to the new location. Release the mouse button to complete the move.